Showing posts with label how to. Show all posts

Wednesday, 17 October 2012

How To: Makeup Removal.


Bioderma Crealine H20 - £10.95 (eBay)

It used to be that evening makeup removal was a laborious chore that I would do anything to avoid, it is perhaps why I don't wear so much makeup these days - especially eyeliner. Yep, that's exactly how much I hated the task. 

I've introduced a couple of products in to my nightly routine which has made the mundane task of removing makeup less of a chore.
The first of these products is of course Bioderma, a favourite of mine for removing any kind of tough makeup, as well as foundation and base products, without spreading it around your face. Bioderma is a micellar solution, it dissolves the makeup so it's easily removed without looking like Taylor Momsen. 
This really makes makeup removal so simple and easy, I squeeze a little bit of this on to a cotton pad and hold it over my peepers for a few seconds and then wipe off eye makeup. Le simple. 

Bioderma can be used to take off all makeup, but I prefer product number two - REN No.1 Purity Cleansing Balm. Who doesn't love a cleansing balm? Simply squeeze a small amount of this in to hands, warm it up between your palms and massage in to skin. 
I usually have a lifetime supply of muslin cloths (eBay link here) on hand to gently remove the excess - running the cloths under warm water makes removing makeup so easy. I tend to take eye makeup off first with the Bioderma so my cloths aren't stained by my eye makeup, but if I'm feeling particularly lazy then I skip the first stage and use the cleansing balm all over as I only have mascara and eyeshadow to take off. 

So there we have it, the lazy girls guide to removing makeup. Surely I'm not the only one who hates this task?! 
What products do you use to remove makeup?

YouTube - Instagram - Facebook - Bloglovin' - Twitter

Looking for a review? You might find it in my product directory!

Wednesday, 3 October 2012

Tutorial: Textured Waves with TRESemmé Texture Style Range.


Textured Waves with TRESemmé Texture Style Range *

My hair is naturally quite straight with a hint of wave, I don't like using heat too much so I've put together this tutorial which requires no heat or styling tools. 
I recently received the TRESemmé Texture Style range and after seeing a demonstration at the event in London, I decided to give myself some beachy waves - without the use of heat. 
This hair style is really quite simple and requires almost no effort, just the way I like it.

On freshly-washed, towel-dried hair, apply a small amount of the Texture Style Velvet Creme to the bulk of the hair, I usually avoid the roots which creamy products as they can weigh down my hair. This is great for separating up the waves to create a more beachy look, rather than the waves falling together and looking too "done".
This is perfect for those with layers, it creates a more choppy, messy look with texture, and it is aimed towards short to mid-length hair (which is the category I fall under).

After this, apply the Tousled Wave Spray, this is ideal for those with longer hair but it's actually my favourite product from the range. It gives a whole load of definition to my hair, making it look messy and wavy without feeling weighed down or crispy. If, like me, you find it difficult to make your hair wavy or keep it in style, then this is the product for you. 

Next, plait the hair in to a French braid - not the easiest of styles but it doesn't have to be neat as you're just leaving your hair in this style to set the waves. I quite often French braid my hair to make it wavy, it saves using heat on your hair and it's such a quick and easy way to get lovely waves. 
I go for a French braid rather than a usual braid as it means the top of my hair is also wavy. 
I find this works best if it's left in over night, the trick is to leave your hair to dry slightly before carrying out this tutorial - if you don't have time to leave it in overnight, then leave it to dry during the day or blast it with the hairdryer. If you want loose waves, keep the braid loose and messy, if you want a more obvious wave, make the braid tighter by pulling in the sections. 

Once your hair is dry in the morning, take the braid out and lightly run your fingers through your hair to separate. Flip your hair upside down and spray the Divine Definition Spray into hair by aiming it up into the waves, no brush is required because we don't want it looking too sleek. This product works like a dry shampoo to give the hair texture and definition, it separates the waves and layers to give hair a more messy, effortless look. I love this spray and use it daily to give my hair a bit of a casual, tousled look. 

Lastly, apply the Backcomb dust to the roots to give even more volume and lift. I love this little bottle, it adds so much to my hair in terms of volume and texture without leaving too much residue in the hair. It's one of my favourite volume powders and I use it most days. You only need a small amount to give a lot of lift - afterwards, gently massage it in to the hair at the root and you're done! 

What do you think of my effortless waves with TRESemmé's Texture Style range? 


YouTube - Instagram - Facebook - Bloglovin' - Twitter

Looking for a review? You might find it in my product directory!

Friday, 21 September 2012

Tips For Growing Hair.


One thing I'm always astonished by is how quick my hair grows. At the start of this year it was barely touching my shoulders and I had a fringe at my eyebrows. I'd say the my hair is now a good 4 or 5 inches longer since January and a whole lot thicker and healthier. My hair obviously isn't long as such, but a lot of people ask me for tips on getting their hair to grow so here we are. These are just what has worked for me in the last 8 months and not everything you can do.

01. The first thing to remember is how much heat damages your hair. The last time I used my straighteners was... months ago! I rarely use them or apply any heat to my hair on a regular basis. I know everyone isn't like this, I probably prefer my hair slightly more wavy but I'm lazy and I've also seen how much my hair grows sans heat. Try and reduce the heat you apply to your hair, I use my hairdryer to dry my hair after every wash, so probably 3 times a week but I don't overdo it. I gently brush through and apply serums and/oils and then run my fingers through to separate and leave to dry naturally for around 20-30 minutes - this makes all the difference and you'll notice you really cut down on drying time!

02. Find hair products that suit your hair type. I really wasn't a fan of my hair until I got to know it, it's fine and can get oily and weighed down easily - using heavy conditioners was weighing down my hair and I found myself needing to style it with straighteners or tongs constantly and wash/dry it more often, meaning I was using heat all the time. After I bought shampoo and conditioner for fine hair, like the Phytovolume range from Phyto, my hair sat better and lasted longer between washes. I wasn't reaching for styling tools constantly and my hair wasn't falling flat at every opportunity.
Once a week, if you feel it's necessary, use a hair mask on your hair to keep it in check. I rarely do this as I hate too much conditioner in my hair, so I leave in my normal conditioner for a few extra minutes occasionally. This will prevent damage to hair and keep it silky smooth.

03. Be gentle. Although I have fine hair, the ends can get tangled easily. I stopped using conditioner for a while because I felt that it was just weighing down my hair, so before I found something which was lightweight and suitable for my hairtype, I had tangled, dry ends. Not good. I used to get my boyfriend to brush my hair and it would take so long, even with a Tangle Teezer (which I'm not a fan of), to brush and detangle my otherwise soft hair.
I swear by a small amount of L'Oreal Mythic Oil in the ends of my hair, it detangles and protects and leaves my ends silky smooth. I also use the Denman Tangle Tamer to brush through, it's such a good brush to gently detangle hair without breaking or damaging it. I have recently found out this is a kids brush, but it's one of my favourite hair brushes and very cheap so I really recommend it! It's so gentle and I think this is one of the reasons my hair never seems to break off or have split ends.

04. Protect from heat damage. Using heat is going to happen, as I've already explained not even I can live without it and I'm pretty laid back when it comes to my hair. I swear by a quick spritz of the TRESemmé Keratin Smooth Heat Protection spray, not only does it protect against heat damage but it also leaves hair silky smooth! Great for those who rely on straighteners to tame unruly hair.

05. Eat well and take supplements. Unfortunately for me, I have a rather awful immune system which means I have to take vitamins regularly or I get sick. I was brought up eating well so it's kind of stuck with me, and the added vitamins are probably another contributing factor to my good hair growth.
I don't take anything special, usually just Multivitamins but I make sure to get Iron, Vitamin C, Vitamin B and Zinc on a regular basis. I don't take anything specifically for my hair, these are just to keep me well but a balanced diet will help with hair growth.

What are your tips for growing hair and keeping it healthy?

YouTube - Instagram - Facebook - Bloglovin' - Twitter

Looking for a review? You might find it in my product directory!

Thursday, 20 September 2012

Effortless Everyday Makeup.


Rimmel Scandaleyes Waterproof Kohl in Nude *

As the months get colder, Kate gets lazier. And sometimes, more inventive with the makeup routine. On days where I've sacrificed a well made up look for an extra ten minutes in bed, these are the products I reach for to keep my makeup looking fresh and effortless.

I always start these hurried mornings with the MAC Prep + Prime Skin Base, it's one of those "do all" products that I adore. It's the only primer I have that gives a glow to the skin whilst also smoothing it over. It also helps with blotting away excess oil - perfect for post run to catch the train! My base looks flawless after using this little wonder, and I follow it with the Dr Jart Water Fuse BB Cream - another product that I rate highly. This is good coverage, easy and quick to apply and leaves my skin looking healthy without heavy coverage. It does help to really coverage imperfections, but for any other blemishes showing through, I use my trusty Collection Lasting Perfection concealer. An absolute favourite of mine, I will never be without it!

I continue the slap dash makeup routine with yet another Holy Grail product of mine, the Stila Convertible Colour blush in Lilium. This is the perfect pop of colour to make your skin look alive and ready for the day. I pop this on to my cheeks with warm fingers and quickly work in with a Stippling brush. As this is a lip and cheek product, I also dab a little bit on my lips for an effortless but gorgeous lip colour.

After the base is done, I spend a bit of time making sure my eyes are looking awake and bright! I swear by nude eyeliners to give my tired eyes a boost, I have issues with my eyes and they often look red so a nude eyeliner is one of my essential products. I don't wear any other eyeliner but nude, it conceals redness and makes eyes look so bright and open. I use this new Rimmel number to line along my waterline and also the inner corner of my eyes. You'll be surprised at how much this does for you!
My brows frame my whole face so they're never missed off my routine. I quickly brush through my brows to tame with the HD Brows Brow Beater, it keeps them in place all day and gives them the perfect shape. I then fill in and define with my favourite pencil, the Laura Mercier Brow Pencil. This makes my brows look so strong but natural.

Lastly, a quick slick of my favourite mascara, the Clinique High Impact Extreme Volume, and I'm finished!
This whole look takes no time at all but my makeup looks flawless and fresh, without the pale complexion and tired eyes!

What are your tips for an effortless makeup routine?

YouTube - Instagram - Facebook - Bloglovin' - Twitter

Looking for a review? You might find it in my product directory!

Tuesday, 11 September 2012

How To: Neat, Arched Brows.


HD Brows Tweezers - £19.96 *

My look only comes together once I've filled in my brows, although I don't do much to them. I usually do my eyebrows last, and I find they really frame my face and my makeup falls in to place after they're finished. 

I usually get my eyebrows waxed every couple of months to make sure the shape is accurate and done by someone who knows. In-between waxes I use the HD Brows Precision Tweezers, they are so accurate and keep my brows the right shape and really neat.

On a daily basis, I reach for the HD Brows Brow Beater, a product which shapes the brows and sets them in place (over time helping to tame unruly brows in the long run too). I find this step is really important in getting a good shape and keeping the arch shape that I like. This dries and keeps my brows looking neat and tidy for the day ahead.

I usually get them a quick brush through with my Real Techniques Brow Groomer, or any sort of brow comb, before using the Laura Mercier Brow Pencil to fill in.
I went for Soft Brunette in the brow pencil, but obviously get a shade that matches your brows. I don't like mine dark, just the right shade to match my hair colour. I carefully follow my natural brow shape and just dense out the brow and make it more defined. I don't like over the top brows and find a brow pencil gives a natural shape without being too dark or looking fake and drawn on. 

Once I'm happy with the filling in process, I give them another quick comb through with the brow brush and they're done. 
I've been using this technique for the last year now, and I love how defined yet natural my brows look. I'm looking to try some of the Anastasia products, but at the moment I'm really happy with the way my brows look and the products I'm using. 

What are your brow favourites? 

YouTube - Instagram - Facebook - Bloglovin' - Twitter

Friday, 31 August 2012

How To: Glowing Skin.


If there's one thing I always look for in makeup and skincare, it's a glowing finish! I love the healthy finish to my skin and I always purchase products which help to achieve this. 

Recently I've been trialling this wonder by Caudalie, the Vinexpert Radiance Day Fluid - a new lightweight fluid which helps to hydrate and illuminate the skin. I use this in the morning to give my skin a quick boost, it leaves my skin looking so radiant and helps to hide away blemishes and dull areas. 

Next up, I apply a product I've been using recently which is Chanel's Le Blanc De Chanel, a smooth, liquid primer which gives skin a brilliant glow. It's used as a primer, under makeup or alone, to give a smooth finish to skin and also a lovely soft glow.
I sometimes add it in to my foundation if i'm in a hurry and I really like the even finish it gives. 

Lastly is my all time favourite highlighting product, MACs Soft and Gentle MSF. I use this daily and adore it, it's just the right amount of glow to my cheeks and adds so much to my skin. This smooths over my pores and generally makes my skin look flawless and so radiant. 

I use the Caudalie moisturiser and MAC MSF daily, but save the Chanel base for days when my skin needs a real boost. I don't always use these three products together as it might be overkill, but the moisturiser is more of a healthy glow, rather than a sparkly finish so this goes so well with Soft and Gentle, used as a highlighter. 

What do you think of my glowing skin favourites?

YouTube - Instagram - Facebook - Bloglovin' - Twitter
Vote For Me in the Cosmopolitan Blog Awards!

Wednesday, 29 August 2012

Review: New Volumising Hair Products.


I filmed a video a while back which was all about adding volume to fine hair, so I thought I would do a little update on this as recently I've been trialling a few new products that aim to boost fine hair by adding volume and body. 

I picked up these Redken products in the Feelunique sale after reading that they remove product build up (ideal for those who regularly use dry shampoo!) whilst also adding body to fine hair. So far, I love both products - the shampoo leaves my hair so cleansed without adding any product and the conditioner is so lightweight. I usually don't like using conditioner as it just weighs down my fine hair, but Redkens Full Body conditioner helps my dry ends as well as adding body and strengthening hair, without leaving my hair flat and lifeless. 

The next product is by Phyto, a haircare brand I love and have blogged about a few times. I've had this volumising spray on my wishlist for a while so I was so pleased when I received it recently.
I spray this in my roots after washing with the Redken products and after blowdrying my hair feels so big and textured. I absolutely love how full my hair is after using this product and it has quickly become my go to hair product for big hair!

Lastly, for in between washes I use this VO5 Plump Me Up Dry Shampoo - it adds volume whilst also cleansing the hair. My fine hair gets oily quickly so dry shampoo is a must. I find the VO5 ones to be the best and I own quite a few, they don't come out white or make your hair grey and I don't find the product builds up in my hair.

What are your favourite products for adding volume? 

YouTube - Instagram - Facebook - Bloglovin' - Twitter
Vote For Me in the Cosmopolitan Blog Awards!

Wednesday, 22 August 2012

How To: Conceal Blemishes.


I know how difficult it can be to make skin look flawless without slathering on loads of full coverage foundation, so I've put together this post for people who, like me, like to keep makeup natural whilst also camouflaging even the most unsightly blemishes! 

For a good, natural-looking base, prep is the key. When I come out of the shower or I've just cleansed my skin, my blemishes or imperfections look red and more noticeable than usual. The first thing I do is spray a few pumps of Caudalies Beauty Elixir all over my face, this calms the blemishes and takes away redness. It also helps my skin in the long run, too. 
After this, I gently apply a pea sized amount of Origins VitaZing moisturiser to give my skin a glowing finish with just a touch of colour. I find that since I've incorporated VitaZing in to my routine, my skin looks a lot more flawless before I've even touched foundation. 

The next step is to prime, and for this I use and recommend only one product - Clarins Instant Smooth primer. This is the Holy Grail of all primers, no matter what your skin type. It calms and hides blemishes, helps with excess oil and doesn't cling to dry patches. My skin always looks amazing after applying this and I find blemishes are hidden and I'm able to apply a light to medium coverage foundation. 

This next step is when you would apply your foundation, if you wear any. I'm going to skip this step, although personally I do wear foundation but it's not always necessary. If you feel the rest of your skin is overall quite good, then skip foundation or just apply a small amount. 
The key is using a small amount of a good coverage concealer to hide blemishes, rather than layering on foundation. You will find your skin looks so much more flawless and natural, and you don't have to deal with your foundation slipping off or looking caked if you're using less.
I swear by Collections Lasting Perfection concealer, it's amazing coverage without looking caked and it stays all day. I own quite a few high-end concealers but this one is £3.99 and has never failed me. Apply with your fingers or with a lightweight brush and always make sure your concealer matches your skin tone and/or foundation. 

The final step is one that I don't always find to be essential, but for those days when a massive spot has popped up and you desperately need to cover it, then setting your concealer with a powder is a must. I use the Real Techniques Setting Brush to very, very lightly dust on Laura Mercier Foundation Powder. As it's a foundation powder, it's good coverage and it can look cakey if you apply too much. The secret is to apply a small amount to blend in the blemish and set your makeup. 

I think it's important to understand that you can cover blemishes and imperfections without having to layer on heavy coverage foundation and powder, and I think that wearing minimal makeup actually makes my blemishes look a lot less noticeable and helps my skin a lot in the long run too. 

What are your tips for hiding blemishes?


YouTube - Instagram - Facebook - Bloglovin' - Twitter

Friday, 10 August 2012

How To: Add Volume to Fine Hair with Ojon Volume Advance Range.

Ojon Volume Advance, Ojon shampoo, Ojon conditioner, Ojon Dry Shampoo

Being a girl with too-soft, flat, fine hair, I'm always on the look out for products which add volume without weighing down my hair. The ends of my hair can get quite tangled but I hate using conditioner, especially anything too rich, as it weighs down my hair and no amount of volumising sprays will be able to stop it looking limp and flat. 

I've filmed a YouTube video on how I add volume to my flat hair, which you can see here. Since filming that, I attended a styling session with Ojon and their incredible stylists who had a chat with me about my hair and recommended some products. 
I love volume, but my hair quickly goes flat after I've plumped it up with products and although the ends of my hair need nourishment, conditioner is my worst enemy!

I've been trialling some products from the Ojon Volume Advance range which were given to me at the event. I've never really used a shampoo and conditioner for fine hair and after using these products, I wish I had found them sooner. Both products are lightweight, adding volume without weighing down my fine hair. The shampoo leaves my hair cleansed and shiny with a bit of texture at the roots to give it volume until the next wash. The conditioner is an absolute God-send, definitely the key product from the range if, like me, you find most conditioners too rich and heavy for your hair. I use the Volume Advance conditioner every wash and I love the results it gives. 

On towel-dried hair I apply the Volume Advance Thickening Spray to give my hair some texture and volume. I always use volume sprays in my hair and this has superseded every other spray in my collection. It's incredibly light, it leaves no residue in the hair - it's not greasy and I don't notice product build up or my hair looking dull. It simply gives my hair a bit of grip and volume at the roots. 

Lastly, in between washes I use the Rub Out Dry Cleansing Spray, a lovely and light dry shampoo which smells natural and really cleanses my hair between washes without leaving any residue. There's no white spray or plastery feeling, and my hair looks clean and volumised. I mentioned this product in my "How To Tackle Oily Hair" post, it's my go to dry shampoo! 

I've tried quite a few products from Ojon recently and have loved the results, I really recommend finding a range that works with your hair and really suits your hair type.

What are your product recommendations for fine hair?

Thursday, 2 August 2012

How To: Silky, Smooth Skin.


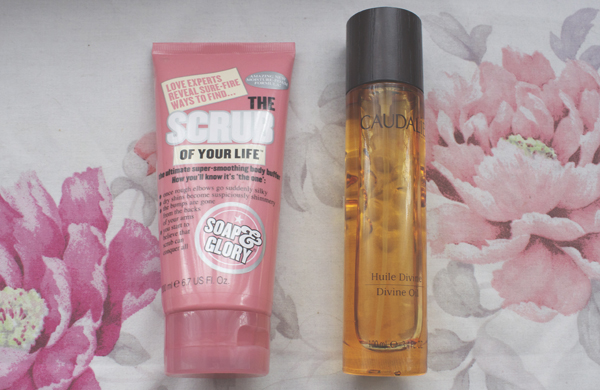
Soap & Glory Scrub of Your Life - £7
Caudalie Divine Oil - £25

I know you all want me to stop talking about Caudalie's Divine Oil but I just can't, it really is amazing! Recently my skin has got a little bit dry, especially at the tops of my arms where it gets quite rough and generally isn't all that smooth, and I wanted to get myself in order for when the sun finally showed itself. 

I love Soap and Glory products, especially their body creams and exfoliators. I love the Breakfast Scrub, it smells divine and just makes my skin feel so nice but I don't really like tubs of things as I think they can be a bit unhygienic and also when you're in the shower and have to scoop out product with your hands, water runs in and spoils it so I picked up this tube of body scrub 'Scrub of Your Life'. 
I've been using this a couple of times a week to buff away dry skin, especially at the tops of my arms and shoulders and also on my legs. This leaves my skin feeling so soft and smooth, without being overly abrasive or harsh - plus it smells amazing. 

Next up is my 'product of the month' Caudalie Divine Oil (review here), I absolutely adore this product. It's lightweight, nourishing and easy to dispense with the spray pump. It's also multi-use so it can be used in the bath (which I usually do), on skin, hair and nails. I liberally apply this all over after I'm out of the bath or shower, I just spray it on to my skin and rub in. I sometimes use this after a body lotion but mostly I like it on it's own as it isn't tacky or overly oil, more like a dry oil.

I absolutely love this combination, it just seems to work so well and the skin on my arms is back to feeling soft and moisturised. I usually spritz the Divine Oil on the ends of my hair and on my face too, it's just an amazing product.

What do you use to help with dry, rough skin? 

Friday, 20 July 2012

How To: Tackle Oily Hair.


For as long as I can remember, I've had to wash my hair every day. It's just something I had always done and my hair was used to getting a good clean everyday. Over time, I envied my friends volumised, messy 'dos and realised I had to stop washing my hair. 
My hair is fine, soft and hard to manage. I overcome this by using various products, but my hair is so much easier to manage now I can go a few days with washing (not to mention the extra time in bed). 

It's taken me a couple of months to go more than a day without washing, and I've found some absolute gems that I simply cannot live without. 
The first one I have reviewed before (here) and this is the Phyto Clarifying Detox Shampoo. I honestly cannot praise this enough, it's THE product which I can thank for my hair going from fine and flat and being washed every day to it's current wonderful state.
This is a detox shampoo, you use it once a week to thoroughly cleanse the hair, removing product build up and extending the amount of time between washes. It's similar to the Bumble & Bumble Sunday Shampoo, and although I love B+B I have to say I prefer Phytos offering. 
After using this shampoo I can go two or three days without washing which is amazing and I need to use a lot less product in my hair. If you're trying to cut down on washing, I highly recommend using this once a week, it's a great shampoo. 

After using the above shampoo, my hair needs a little bit of conditioner, one that isn't too heavy and won't weigh down hair. As I said, my hair is rather fine so rich conditioners just leave it flat and weighed down. I love Phyto products and this Phytobaume conditioner is really light and great for the ends of my hair when I need conditioner. I don't always use conditioner, but I find I do need it after using the Detox shampoo. Only use conditioner on the ends of your hair, a small amount will do. 
It depends what hair type you have, so you may have a conditioner which suits you but I really rate this one from Phyto. 

In between washes, I usually don't need dry shampoo the next day, although by the second day and definitely the 3rd I'm reaching for this Ojon Dry Cleansing Spray (dry shampoo by another name) which is incredible as it leaves NO trace of powder in your hair. You don't have a grey, powdery mop but you do have a beautiful, oil-free, volumised head of hair. 
I absolutely love this dry shampoo, it's great as a volumising product and I use it often. It's amazing to finally get hold of dry shampoo which leaves no trace in your hair. 

Keep up the no washing and you will notice that the time between washes gets longer and longer. I love when my hair is still shiny and clean on the second and third days, but it has taken a little while to get to this point. I really couldn't have done it without these products. 

Are there any products you recommend for oily hair? 

Monday, 16 July 2012

How To: Minimise Daily Makeup Part 2.


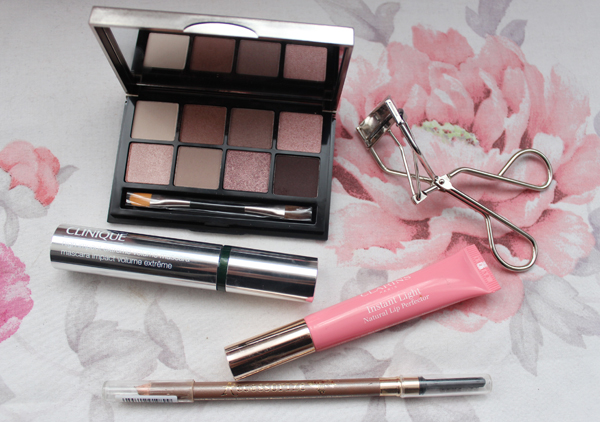
Clinique High Impact Volume Extreme Mascara - *
Accessorize Brow Pencil *
Clarins Instant Light Lip Perfector in 01 *

Following on from this post, here is the second part of my guide to minimising daily makeup. This post focuses on eye makeup, as you may have noticed if you've been following my blog for some time, I've stopped wearing eyeliner completely. Read on, and I will tell you my hints and tips for wide eyes without the slap!

I used to wear liquid liner everyday, but I found that thick black eyeliner was making my eyes look small and harsh. I decided to just go without, my eyelashes are naturally quite long (thankfully) and the day I stopped wearing eyeliner I got quite a few compliments on how long they looked as they were suddenly more apparent. I, personally, look so much better without eyeliner - my eyes look wider, brighter and clear blue.
I understand not everyone looks better without liner, so if you can't live without it, try swapping to a soft brown liner instead. Even if you think you look different at first - and it may be a shock, I used to think I looked tired and dull - give it a week and see how you feel. I doubt I would ever go back to wearing eyeliner now, but that's just me and I know not everyone feels like that!
Instead, I have swapped dark, thick liner for eyeshadow, this Bobbi Brown Desert Twilight palette is full of lovely soft browns which give my eyes a boost in a way eyeliner never did, I much prefer wearing eyeshadow to eyeliner. Before, I used to think I looked a bit overdone with eyeshadow and eyeliner, but now I love experimenting with subtle eyeshadow shades.

To open up eyes, I use the Shu Uemura curlers. These are definitely the best tool I own, they are worth every penny and more. I never used curlers before these, the brands I had tried previously aren't a match for Shu Uemura! These will really change how you do your makeup, and allow you to wear a lot less mascara. I don't need to wear fake lashes (which is lucky as I have zero patience for that kind of thing!) so I slick on a touch of mascara like Cliniques High Impact Extreme Volume and my eye makeup is done. It takes no time at all, but my eyes look bigger and brighter than before.

At the end of last year, my brows were ridiculous, obviously drawn on and really dark - swapping from a matte powder to a medium brown pencil and combing through with an eyebrow comb after has meant my eyebrows now look far more natural. Your eyebrows frame your whole face, my makeup only comes together once I've filled in my brows, so experiment with a comb and a pencil - I promise you, you will see a difference.
The best advice I've heard recently is "they're sisters, not twins", don't aim for exact eyebrows, no one is completely symmetrical and more importantly, no one should be looking at them that closely anyway.

Finally, my lip favourite product at the moment is Clarins Instant Light Natural Lip Perfector in 01. This is like a primer, balm and gloss all in one. I wasn't a fan of glosses before this, but this has completely changed my thoughts. A great product to slick on during the day to keep lips looking smooth, flawless and glossy with a hint of a natural colour. I love this product, and it really pulls the whole natural, flawless look together.

So there we have it, a long but informative guide to cutting down on your makeup. We should be enhancing our features, not hiding them with layers of makeup. I've had a lot more compliments now I've changed my makeup routine and I feel better (and hella more natural) for it.

What are your thoughts on natural makeup? Don't forget to check out Part 1. here. 

Sunday, 1 July 2012

How To: Sunday Night Detox Mini-Facial.


When I arrive back from Glasgow on (almost every) Sunday night, I look horrific. I've spent the last three days ignoring my usual skincare routine, and on top of that, spending a lot of time eating, drinking and having late nights. Combine that with the long, dehydrating train journeys and stress of trying to carry my life across London and you can imagine what we're dealing with here.

Sunday night is always, always my pamper night. I make up for those three days of ignoring my skin with a deep cleanse and I love it, I actually look forward to it!
After seeing this video by Origins of a mini-facial and Annas post (who has the same skin type as me and impeccable taste in products) I thought I'd share my Sunday night routine.

After cleansing, I usually use the Origins Zero Oil cleanser or just Bioderma and cotton pads as I don't usually travel back with makeup on (sorry fellow commuters), I apply the REN Anti-Blemish Treatment mask - I have three REN masks and I love them. I fell in love with REN when I interned at their PR company a year ago and I haven't looked back, REN is my favourite skincare brand and I love all of their products.
This really detoxes my skin and helps to calm blemishes (I always come back with spots!) as well as helping with excess oil and clogged pores. After this has been washed off, I use my Caudalie Beauty Elixir, another product that I've been using religiously for months now. My skin loves this and I love how it soothes redness and blemishes, whilst also helping to give my skin moisture.

Now, you may be wondering why I didn't use an exfoliator. That's because I have discovered chemical exfoliants and I find these to have a much better effect on my skin than abrasive, scrub exfoliators. My skin is a little on the sensitive side after I get back, and it's a bit much to go in with my Clarisonic and Alpha H Liquid Gold (although I adore these both). I have been using the REN AHA Concentrate, which uses fruit acids to remove dead skin cells and leave skin looking healthy, glowing and flawless. This is similar to Liquid Gold but a lot less harsh on my skin. It took me a while to get the hang of the AHA Concentrate (ie when to use it, how often etc.) but I think on my skin it can be used quite often (usually every second night) and leaves great results. My skin has been looking so much better after discovering this.

I absolutely love using facial oils at night, even though my skin is slightly on the oily side I've always seen so many benefits from using oils. I use Clarins Lotus Oil most nights, it's light and leaves my skin glowing and so soft and clear. I spend a few minutes massaging this in to my skin to increase circulation, I see so many good results from doing this so I always try to do it in the evening.

For moisture, I usually go for the Avene Skin Recovery Cream - it's very sensitive, contains few ingredients and really helps to nourish and soothe my skin. I do prefer the results of the REN AHA Concentrate on it's own, but I think if I'm going to use any sort of night cream, then this is the one I reach for. It's a beautiful moisturising product which is light and refreshing on the skin and really helps to calm, I find it's great for blemishes too.

Lastly, I dab on a bit of La Roche Posay's Effaclair AI to blemishes, this is again very soothing so it doesn't irritate blemishes.

This seems very long, but it really only takes a few minutes after the mask has been on. It's all been trial and error to see what my skin loves but this is the Sunday night detox facial my skin is craving at the moment. I find that if I spend a bit longer on my skin once a week, I can cut down on my routine through the week and only do the essentials!

What is your Sunday night routine?

Monday, 28 May 2012

How To: Clear Up Blemishes.


I've suffered from blemishes for as long as I can remember, it comes and goes as it pleases but mostly I struggle with my bad skin! Overall, my complexion isn't too bad, but around my cheeks and chin, I'm prone to under the skin nasties which are painful and leave marks.
This is a more specific version of my Evening Skincare Routine with a few products added in, and the products I've been reaching for recently as my skin hasn't been the best. Note: I'm really unsure what causes the blemishes, perhaps I'll never know!

I've been using the Origins Zero Oil cleanser for about a month now and my skin seems to like this. It's natural and refreshing and doesn't leave my skin tight and try after use (always a good sign) and I feel it's quite gentle yet effective. I occasionally use this with my Clarisonic as it creates a lovely lather and leaves my skin looking clear and healthy. 
After cleansing, I usually apply a REN mask, of which I have two. The Invisible Pores Detox mask (full review here) is one I reach for when my skin is breaking out, the clay brings everything to the skin whilst also removing dead skin cells and helping to control oil. I find that this mask usually helps to clear blemishes pretty quickly, and prevents more breakouts. It's a great mask and I use it once a week and notice a big difference in my skin. 

When my blemishes are starting to clear, but the red marks and scarring are still there, I reach for my all time favourite mask - the REN Glycolactic Radiance Renewal Mask (full review here), this contains fruit acids to give a gentle exfoliation, it helps blemishes, blemish scarring and clogged pores. I find this helps my skin so much. It gives a slight tingling sensation (which I always think means it's working) and my skin looks healthier and more radiant after use. Over time, this does help my blemishes but of course it takes a while to help the scarring - hopefully it won't be long until this really helps!
The Caudalie Beauty Elixir (full review here) is something that everyone is raving about. It's a serum and toner in one and helps to soothe and calm skin. It's great for helping clear skin and it gives so much to the skin, it's really one of those miracle products. I spray this over my face day and night to help clear blemishes and take away redness. 
After this, I apply my favourite serum - Estee Lauder Advanced Night Repair. This is such a glorious product and my skin looks so much clearer upon waking up, after applying this at night. I use this to feed my skin and also help to keep blemishes at bay. I'm also hoping over time it will help to clear scarring on my cheeks and chin. I can't recommend this product enough, my skin seems to love it. 

Finally, for spot treatments I have two absolute favourites. Firstly, Aesop Anti Blemish Masque is a lovely product to soothe blemishes and calm redness. I usually dot this on blemishes overnight and they are significantly reduced in the morning, as well as a lot less noticeable as the redness is gone.
It's a rather expensive little product but one I know works and I would highly recommend. 
My all time favourite spot treatment is Malin+Goetz Acne Treatment (full review here), a sulphur based product which draws out impurities and clears up blemishes overnight. I absolutely adore this product and out of all the products I've tried to help my skin, this is the one I see the most results from. I'm on my second bottle, and I've been using it for well over a year now. It's incredible. I apply it on my blemishes one by one at night and leave it to do its magic. By morning, the spots are barely noticeable. It works wonders on whiteheads but also helps the painful under the skin blemishes too. 
I absolutely recommend this spot treatment, I've tried many in my time but nothing beats this. 

What are your favourite blemish fighting treatments?

Sunday, 20 May 2012

How To: Easy Manicure ft. Essie & OPI.


Sally Hansen Gel Cuticle Remover 

I've never been a massive fan of painting my nails, I find it a chore and I'm always looking for ways to speed up the process whilst also keeping my nails in good condition.
Naturally, I think my cuticles and nail beds are pretty good, but I do like to use this Sally Hansen Gel Cuticle Remover (I'm not sure if you can still buy this, but there are a lot of products out there that do a similar job) to remove cuticles before I start on my nails. It basically dissolves the cuticles, I use a stick for pushing cuticles back to remove the excess cuticles (grim) which really makes all the difference and helps my nails to look and grow better.
Lush's Lemony Flutter Cuticle Butter ensures my cuticles look healthy and moisturised. This pot will last forever, it's huge! You really only need the smallest amount.

My nails are prone to flaking and nail polish chips extremely quickly on me, meaning I have to paint my nails regularly. I bought OPIs Nail Envy at the start of the year and I can honestly say it's one of the best products I've used on my nails. I have the Matte version, rather than the original, and it makes my nails look so healthy and natural looking - for the first time in years I'm happy to wear polish-free nails. If you need something to help make nails stronger and grow quicker, then you must try this. My nails are so much healthier and rarely flake. I use this before I paint my nails as a base coat but you're meant to paint over your polish every day, but I find this is unnecessary for me.

I bought OPIs Chip Skip a couple of weeks ago after hearing a few nail technicians talking about it. It was used on my nails by a nail technician and the polish lasted so long, I was so impressed that I purchased it. I've only used this a couple of times but I can notice a massive difference. It's not a base coat, it's actually a fluid you apply first which removes any dirt or oils from your nails which means the polish sticks and holds better and is less likely to chip. It's a really incredible product and my nail polish has been on since Tuesday - it's now Sunday and my nails are completely chip free. Even tip-wear is really minimal.
This is definitely another must have product, if you find your nails are chipping constantly, then get this on them!

The Bourjois 1 Second Magic Nail Polish Remover has been a talked about product in recent weeks. I bought this a few weeks ago and I wasn't all that phased about it but I liked that it was handy and as I travel an unhealthy amount, I thought it would come in handy. I think '1 Second' is slightly optimistic but it really speeds up the process. Basically, it's a pot with a polish remover-soaked sponge inside, you simple stick your nail in, twist it a bit and your polish is gone. No mess, it smells nice and leaves nails looking healthy. Definitely something to pick up if you can get hold of it.

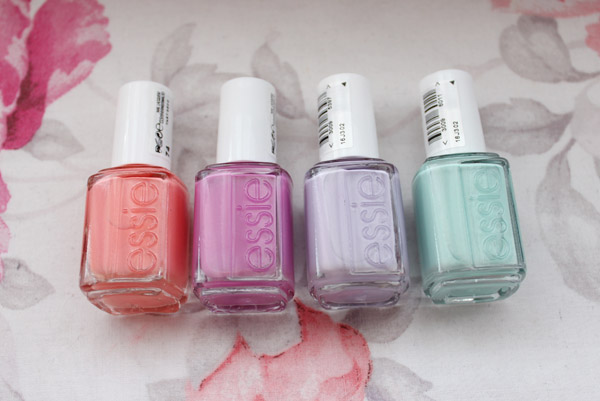
Lastly, my absolute favourite nail polish brand at the moment is the Essie diffusion line (I talk about it a bit more in my latest video), the polishes are slightly smaller and have a different formulation to the usual Essie range. They're also slightly cheaper at £7.99 and can be found in most Boots and Superdrug stores.
I picked up these four colours and I adore them - Tart Deco, Splash of Grenadine, Mint Candy Apple and Lilacism. I can't wait to pick up a few more shades as the colour range is incredible!

So there we go, my favourite nail products at the moment! What nail products do you recommend?  

Monday, 22 August 2011

How To: Photography.


I get asked a lot about what camera I use to take my blog photos, I actually have two which I use for a number of reasons. If I'm at my flat in Leeds, I'll use my DSLR camera which is a Nikon D40, I got it almost two years ago and it's a great "entry level" SLR camera. Eventually I'd like to step it up a gear and get a Canon, but at the moment it works great and I see it as a really good "starter" DSLR as it can be hard to get into the settings etc. I was taught basic photography at university, although I studied Forensic Science, photography is pretty crucial (you'll know this if you've ever watched anything involving a crime scene).
This camera, the Nikon D40, is actually discontinued but the D50 is the next one up in the range.

If I'm travelling or going to festivals, gigs etc. I tend to take my bridge camera, bridge cameras are those that are in between a typical digital camera and a DSLR. I have a Nikon Coolpix P5100 which is great, and produces good quality pictures which are a step down from a DSLR camera.
Do you need a fancy camera to produce outfit photos? Probably not, but it does help. If you're happy with that you work with, then fine. If you feel the need to upgrade, choose one which is a good "entry level" camera that will be easy to get to grips with.

For taking outfit pictures, I use a tripod. I bought a cheap one from Amazon which is really great and lightweight (not because I take it anywhere, but because I move house a lot). It cost about £10 and is a good height and easy to use and pack away. This one is pretty similar, if not the same, as what I have but make sure you purchase one that works with your camera. It should say in the description.
I personally don't use a remote control for my camera, I've never needed one and I like the way I do my outfit posts so it's never entered my mind to buy one. Some people prefer to use them, but I just get in place, reach forward and focus my camera and then shoot whilst on a 10 second self-timer.
I think if I was to start taking my outfit pictures full length, then I would need a remote for my camera, but at the moment I'm fine with my "set up".

When I was looking for a new flat, I made sure to find one with a blank wall to take outfit photos (sad, I know). I adjust the lighting using my blinds and/or light and sometimes edit the brightness/contrast and/or levels in Photoshop afterwards if the colours don't look right.
Sometimes for portrait style photos or other non-outfit photos I'll edit the settings in Photoshop to make it stand out. Like most people, I use Photoshop Actions for this, usually ones I've made myself but you can get heaps online for download.

I'm not a professional photographer, I haven't had massive amounts of training and I'm still learning myself. If you've been reading my blog for awhile, you'll know that my first attempts at outfit posts weren't spectacular and they still aren't perfect. These things come with practice, it sometimes takes me 50 attempts to get a few outfit photos so it really is trial and error!